The AMD FX 8350 is an older yet powerful CPU with 8 cores/threads and a base clock speed of 4GHz right out of the box. According to AMD, you can overclock the FX 8350 CPU up to 4.2 GHz even without any problem using an air cooler.
But with the help of liquid cooling, you can push it even further around 4.8 GHz. And in this guide, we will discuss how you can get extra performance out of your FX 8350.
The FX 8350 is an older CPU that has a TDP rating of 125W. So, overclocking it will definitely bake it up in higher temperatures. AMD stock coolers tend to be bad at handling the temperatures when you overclock your CPU over 4.4 GHz.
So you will need to invest in a good cooling solution if you want to overclock the AMD FX 8350. Ideally, a closed-loop liquid cooling would be better to crush the rising temperatures.
Also, make sure the motherboard that you are using supports overclocking because not all motherboards support this feature.
“Using the CPU Voltage of 1.37V and Northbridge voltage of 1.175V, you can easily push the FX 8350 to 4.8 GHz“
Overclocking AMD FX 8350 to Its Full Potential
For tweaking the performance we are using an ASUS CROSSHAIR V FORMULA motherboard which is a stable motherboard for overclocking the FX Series AMD CPUs. Also, the BIOS Interface of the CROSSHAIR V FORMULA is very easy to use for beginners as well.
Installing Important Software
Before you overclock your CPU, it’s important to install some important programs to test the stability of your computer. You can install either install 3D Mark or Heaven DX11 Benchmark to stress test your CPU and GPU at the same time.
Stress testing is important before doing any overclock as it tells you a lot about the voltage and temperature of your CPU under full load. If you don’t stress test your CPU and directly go with the overclocking, you would be welcomed by BSODs and frequent crashes.
Entering the BIOS
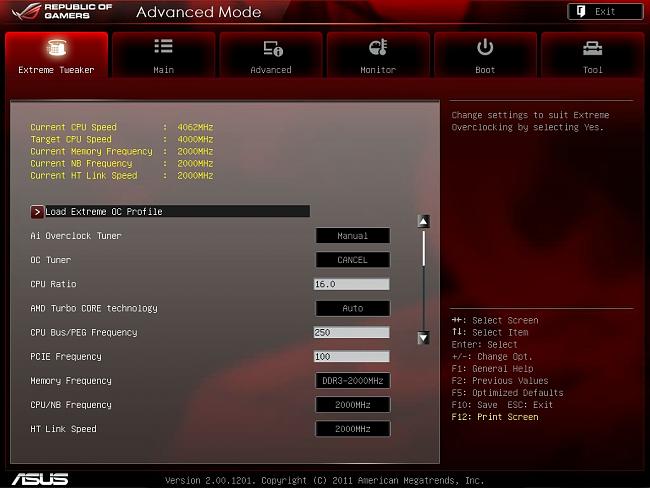
Once you have installed the benchmarking applications, it’s time to restart your PC. After that spam the F2 button to enter the BIOS. Once you are into the BIOS, you will see a menu, the “Extreme Tweaker” tab would be selected by default.
Go to Advanced Tab
Now head over to the “Advanced Tab” and select the “CPU Configuration” (first option on the list). Now set all the options as shown in the image below
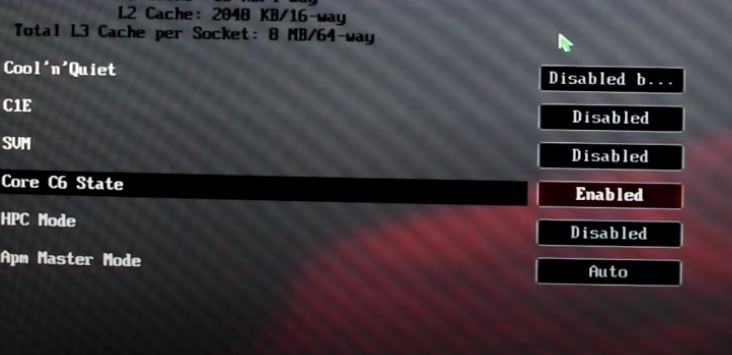
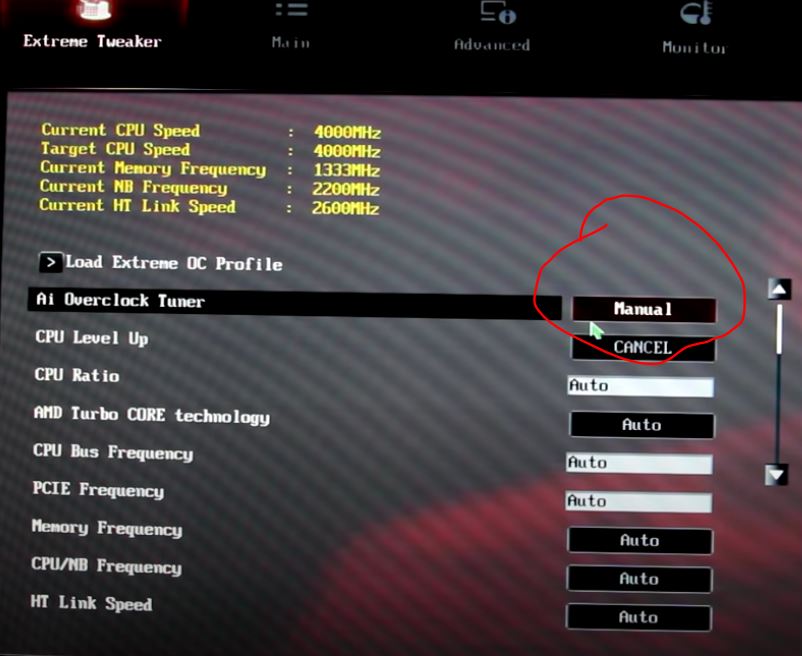
Once you are done with these settings, go back to the “Extreme Tweaker” tab and set the “AI Overclock Tuner” to Manual.
Changing the CPU Ratio/Northbridge & Other Settings
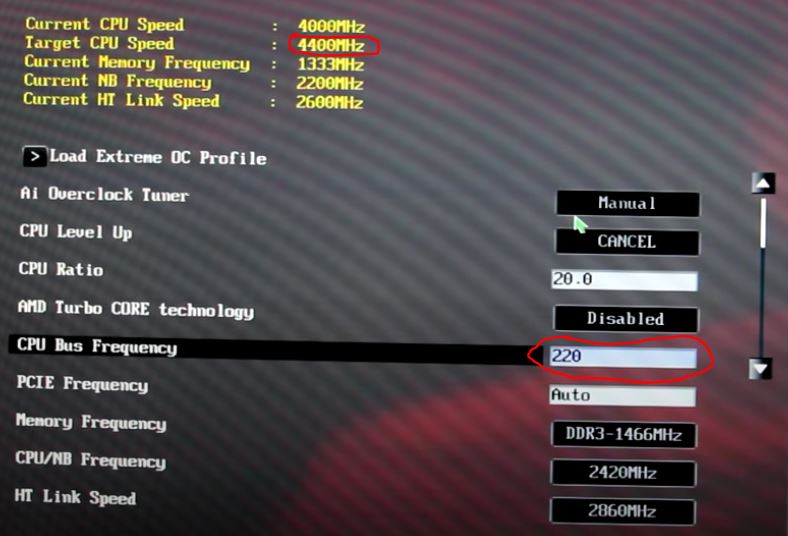
Now change the CPU Ratio to “20” and AMD Turbo Core technology to “Disabled“. Leave the CPU Bus Frequency and PCIe Frequency at “Auto”.
While changing the memory frequency it’s important to choose the type of memory that you are using. As we are using DDR3 ram clocked at 1333 MHz, we set it to a similar value.
Set the CPU/NB (Northbridge) Frequency to 2200 MHz and HT Link Speed to 2600 MHz.
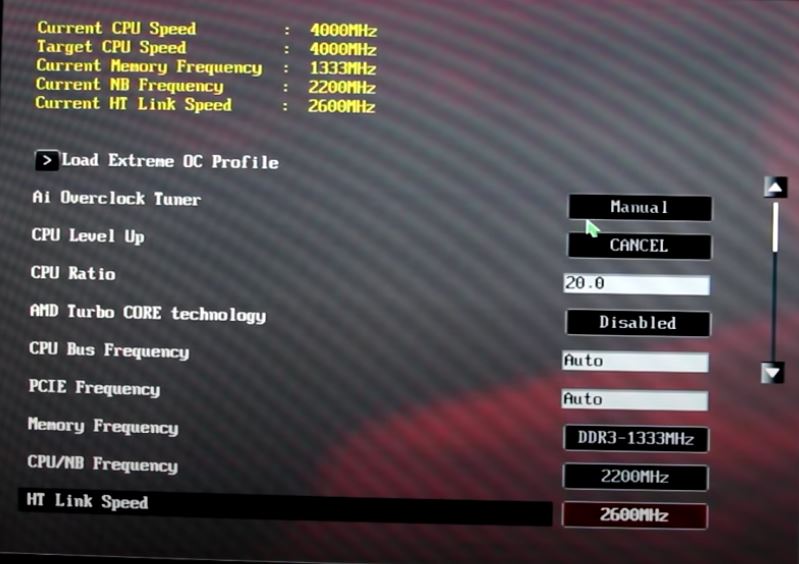
Also, change the settings below to the ones shown in the image

Tweaking VRM/Power Control
As you move down the tab, you will come across the Digi VRM/ Power Control option. Press the Enter button.
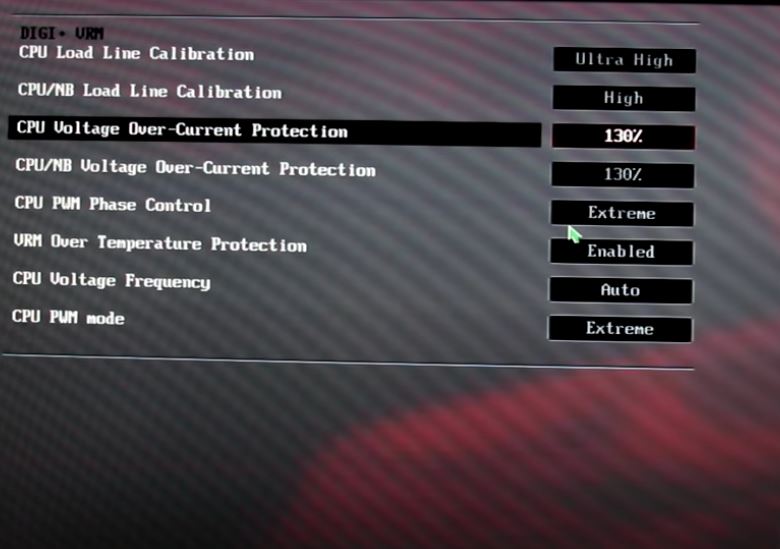
Now you will see a list of features, the first one is the CPU Load Line Calibration. This is one of those things that depends upon the nature of your motherboard and power supply.
The Load Line Calibration is a feature that provides your CPU with extra voltage when needed. If you are using a good-quality power supply with a gold rating, set this option to Ultra.
Just below the CPU Load Line Calibration, you will find the CPU/NB Load Line, set it to “High“.
Set the CPU Voltage Over-Current Protection and CPU/NB Voltage Over Current Protection to 130%. Don’t change the last four settings and leave them as they are.
Setting the CPU Voltage
Now go back to the Extreme Tweaker tab and move all the way down to the CPU & CPU/NB Voltage tab.
Now change the CPU Manual Voltage from Auto to 1.37V or 1.38V and CPU/NB Voltage to 1.17V or 1.20V, both values are safe.

Setting the CPU Bus Frequency
Now as we are done with all the settings, one last step is to change the “CPU Bus Frequency” from Auto to 220. As you set this number, you will see the Target CPU Speed on the top right corner changing to 4400MHz.
Please note that changing the CPU Bus Frequency might change the values of Memory Frequency and CPU/NB Frequency automatically. So make sure you manually change the values that you have set before for both of these features.
Saving the Settings
Now as we are done with our overclock settings, it’s time to press F10 to save and restart your computer. Once you boot up into Windows open the 3D Mark and run the simulation to see if your system remains stable and doesn’t crash as the CPU gets under full load.
Conclusion
Finally, this is how you can overclock your FX 8350 CPU easily and safely. Make sure you have a good cooling solution before you plan to overclock your CPU.
Always stress test your CPU before and after overclocking to make sure there aren’t any issues.
You can overclock the AMD FX 8350 to 4.5 GHz by changing the value of CPU Bus Frequency from 220 to 225. Make sure you move your way up in small increments rather than putting higher values.
Also Learn, How to Overclock Ryzen 7 2700X using BIOS


